

Picture this. You swap your dusty driveway for a green one, feel proud for a week, and then the first monsoon shower arrives. Suddenly your car tyres are sinking into something that looks like chocolate pudding. Not quite the upgrade you paid for.
At Prime Crete, we manufacture concrete paving products for homes, commercial sites and public projects across Pakistan. One question comes up again and again: do grass pavers get muddy?
Here’s the honest answer. They can, but mud is almost always an installation problem, not a product problem. Build the layers underneath correctly, and your green surface stays firm through rain, cars and the occasional overexcited cricket match.
Let’s break down why mud happens and how to stop it.
Why Grass Pavers Get Muddy in the First Place
A grass paver is a concrete grid with open cells. Grass or gravel fills those cells. According to the Interlocking Concrete Pavement Institute (ICPI), the relevant ASTM standard requires grid units to have between 45% and 75% open area. That means a lot of soil sits on show, so what happens underneath really matters.
Mud usually comes from four mistakes.
A Weak or Uncompacted Base
Some installers skip the crushed stone base and lay grids straight on loose soil. It saves a day of work. It also guarantees trouble.
When rain soaks loose soil, it loses strength. Tyres then push the grids down unevenly, and wet earth squeezes up through the cells. That’s your mud.
Sediment Washing Into the Cells
Runoff from nearby bare ground carries fine silt. The silt settles in the cells, clogs the topsoil and chokes the grass.
The US EPA’s permeable pavement fact sheet names clogging as the most common maintenance concern for permeable surfaces. It also stresses that proper installation is key to long-term performance.
Driving on the Grass Too Soon
Fresh seed needs time. If cars roll over it in week one, the roots never anchor. Bare topsoil plus water equals, well, you know.
The Wrong Fill for the Traffic
Grass needs sunlight. ICPI notes that most grasses need at least five hours of sun a day. A parking bay with cars parked all day, every day, blocks that light. Constant shade and engine heat can kill the grass, leaving bare soil behind.
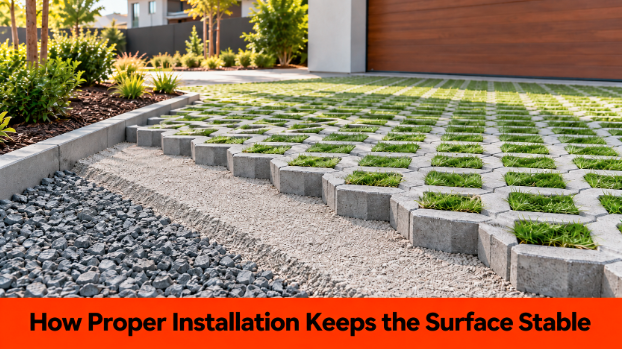
How Proper Installation Keeps the Surface Stable
Good grass paver installation follows a clear layered system. ICPI’s Tech Spec 8 on concrete grid pavements sets out the method most professionals follow. Here’s the plain-language version.
Step 1: Compact the Soil Subgrade
Everything starts with the ground. ICPI recommends compacting the soil subgrade to at least 95% of standard Proctor density. In simple terms, you squeeze the air out of the soil so it can’t settle later.
If your site has weak clay or silty soil, or a high water table, you may need a thicker or cement-stabilised base. A geotextile fabric between soil and base also helps keep the two layers from mixing.
Step 2: Build a Crushed Stone Base
This layer does the heavy lifting. For driveways, parking lots and fire lanes, ICPI recommends a minimum of 8 inches (200 mm) of compacted aggregate base.
A well-compacted base sheds water and stays stable. It spreads the load of each tyre, so the grids don’t punch into the soil below. Honestly, this is where most mud problems are won or lost.
ICPI also advises extending the base at least 12 inches (300 mm) beyond the edge of the grids when no kerb or wall holds them in place.
Step 3: Screed a Thin Bedding Sand Layer
On top of the base goes a layer of washed concrete sand, 1/2 to 1 inch (13 to 25 mm) thick. Keep it even and don’t overdo it. ICPI specifically warns against using stone dust, limestone screenings or masonry sand here.
One practical tip: compact the grids into the sand at the end of each working day. Rain can settle loose sand overnight, and the grids won’t bed down properly afterwards. In our monsoon months, this matters a lot.
Step 4: Lock the Edges
Grids without edge restraints behave like a loose deck of cards. Tyres push them sideways, gaps open, and soil escapes.
ICPI calls edge restraints essential for grid pavements. Concrete edging works well here. Our kerb stone blocks do exactly this job, holding the paved area firmly in place.
Step 5: Fill, Seed and Then Wait
Next, sweep topsoil into the cells, seed the grass and water the area. ICPI says the grass should not face tyres until it’s well established, which typically takes three to four weeks.
Yes, waiting is boring. But it’s cheaper than doing the job twice.
Grass or Gravel? Choosing the Right Fill
Not every space suits grass. Match the fill to how you actually use the area.
Choose grass when:
- The area sees occasional traffic, like overflow parking or a fire lane
- It gets at least five hours of sunlight daily
- Someone will mow, water and weed it regularly
Choose gravel when:
- Cars park in the same spot all day
- Heavy shade covers the area
- Silt from nearby land is likely to wash in
ICPI recommends crushed stone in the cells whenever the owner can’t maintain grass. It still drains well and still looks tidy. It just won’t need a lawnmower.
For spots with foot traffic or bicycles, solid pavers make walking easier. Many designs mix grids with interlocking paver blocks to create comfortable walkways between green parking bays.
Simple Maintenance That Keeps Mud Away
Even a perfect installation needs a little care. Treat grassed grids like a lawn:
- Mow and water regularly, especially in dry months
- Pull weeds before they spread
- Fertilise occasionally
- Keep silt and dust from nearby construction out of the cells
- Clear clogged soil from cells if water starts pooling
The EPA fact sheet also advises diverting stormwater away from any disturbed ground until that area stabilises. That one habit prevents a lot of clogging.
Why Paver Quality Matters Too
A strong base won’t save a weak grid. Cracked or crumbling units shift, and shifting units let soil escape.
ICPI’s guidance lists a minimum average compressive strength of 5,000 psi for concrete grid units. Before you buy any concrete product, ask the supplier for test results. Our guides on water absorption and strength tests and what to check before buying concrete blocks explain how testing works. The same logic applies to pavers.
Do Grass Pavers Really Reduce Runoff?
Yes, when they’re installed well. ICPI states that grids with established grass have a runoff coefficient of about 0.2 to 0.4. Conventional hard pavements sit at 0.9 to 1.0.
In plain terms, a grassed grid behaves much like a natural lawn during rain, while concrete or asphalt sends almost all the water straight off the surface. Less runoff means less standing water, and less standing water means less mud.
Fun fact: concrete grids first appeared in 1961, when builders used them for overflow parking near Stuttgart, Germany. The idea has had over 60 years to prove itself.
The Bottom Line
So, do grass pavers get muddy? Only when someone cuts corners.
Compact the soil. Build a proper stone base. Use clean bedding sand. Lock the edges. Give the grass time to grow. Pick gravel where grass won’t survive. Follow these steps, and you’ll get a stable surface that stays green, drains well and never turns into pudding.
Planning a driveway, parking area or green walkway? Contact Prime Crete to discuss the right grass pavers for your project.

[…] Compact the subgrade, then add a well-graded gravel base and a bedding layer. Skipping compaction is the fastest route to sinking blocks. We explain this in detail in Do Grass Pavers Get Muddy? […]
[…] Lay grass pavers on poorly prepared ground and you’ll get ruts, puddles and a lot of regret. The base layers need proper grading and compaction so water drains and the blocks stay level. We covered this in detail in Do Grass Pavers Get Muddy? […]